


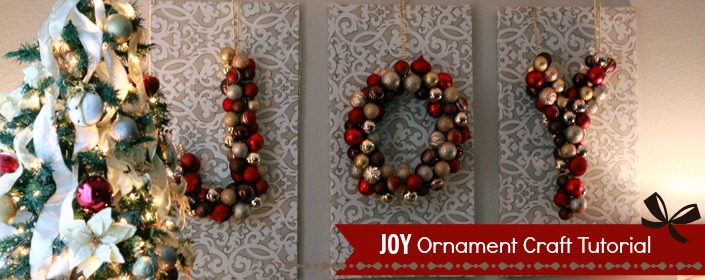
Ornament Craft That Brings JOY
I made these fabric wall panels shortly after moving into our home 2 years ago. We were tight on budget, the wall was huge and it seemed easy enough to construct frames and staple pretty fabric around them. But ever since then, I’ve been wanting to jazz them those fabric panels up a bit, and this JOY ornament craft is the perfect addition this holiday season.
I was asked by Walmart to make a holiday craft and so I looked to add an element of inspiration of gratitude for all that we’ve been blessed with – being joyous certainly does that. And it happen to fit perfectly in those empty DIY fabric panels. Not into joy? This ornament craft is also great to make monograms or ornament wreaths, too.
 Each letter is about xx tall and is hung by Command Strips. I bought 4 tubes of various types of ornaments (all from Walmart – I love the different shapes and hues of brown, gold and pop of red), but only used about 120 ornaments for each letter. Even with Walmart’s awesome prices, I still wouldn’t call this ornament craft “cheap”, but it is definitely one I will be using every year. Also to note, there is noting professional about this craft. However, between each of the letters falling once (I didn’t use the right strips!) and my daughter playing with them throughout the process (buy shatter proof ornaments for this craft!), the letters have held up beautifully. I have no doubt they’ll be part of our inspired holiday decor for years to come.


In addition to your ornaments, you’ll need:
Coat wire hanger (at least 1 for each letter. Y needed 2)
Tool to bend the coat wire hanger (pliers, your hands, scissors – whatever works for you)
Wine corks and a knife to cut them
Hot glue
Instructions:
– Before you do anything, take your ornaments out and hot glue the caps to the bulbs (as you can see above). Many tutorials for ornament wreaths suggest this step and it is a life.saver. After one ornament pops off because you skipped this step, and you can’t fit it back in, you’ll remember I warned you! Glue them all, since can use leftover ornaments on your tree to incorporate the colors into your overall holiday decor, and save yourself the trouble of having to do this step multiple times.
– Bend your coat wire hanger into the shape of your letter. Cut the wine cork into thirds and pierce it into one end of the hanger, using hot glue to secure. This will make sure your ornaments stay put. For the O (or a wreath), I left the cork whole and pierced each end of the hanger into the cork, using hot glue to secure, forming a circle/oval. I used two hangers for the letter Y (one as a V and attached the second as the Y’s “tail”).
*Each letter will have a unique form, thus a different way of bending/arranging the coat hangers. Think this step all the way through and form your letters first to avoid frustration after you’ve started to strand your ornaments.
– Begin to strand your ornaments onto the coat wire hanger. As you add more, twist the ornaments around and around until the fall into each other and begin to look full. Be mindful of how you are arranging them – are you using all the same color? Texture? Shape? Do you want to do a color block? Or more of a random look? Think about the end result as you pick up the next ornament to strand, and keep twisting and spinning the ornaments until the letter form starts to take shape.
– With another slice of cork, secure the other end of your letter to ensure ornaments don’t go rouge on you.


To Hang Joy Ornament Craft:
Each letter is hung with a beaded strand (because that’s what I had on hand), but pretty ribbon or hemp would look great too. The J will need to be hung from two places, as well as the Y, but the O can be hung from the center, with the cork anchor hanging down. As mentioned before, hang with Command Strips of appropriate weight (and these things are pretty heavy!).
If you have any questions, just throw them in the comments and I’ll try my best to answer.
Happy holiday and I wish you all a home filled with decor that inspires and reminds us to be joyous and grateful for all that we have.
*Disclosure: As a participant of the Walmart Moms program, I was provided samples and compensation for my time and efforts in creating this post. All opinions are my own.

3 Comments
DIY Fabric Wall Panels - De Su Mama
May 26, 2014 at 2:56 pm[…] been two years since I made these DIY Fabric Panels and they are holding up great! I even hung our Holiday JOY Ornament Craft on them this year and it was beautiful! Recently, I made a second panel for my patio with an […]
DIY Fabric Panel Tutorial For Outdoor Wall Decor - De Su Mama
May 26, 2014 at 3:03 pm[…] Our Home, which is focused on memory making and family legacy, including a inspired holiday craft (DIY Ornament JOY Sign) hung on these fabric panels during Christmas! Or check out our newly spruced up backyard, where […]
Siblings First Christmas Photo Memory Shadowbox Craft - De Su Mama
November 19, 2014 at 11:14 am[…] Inspired Home Decor: JOY Ornament Craft for the Holidays […]