


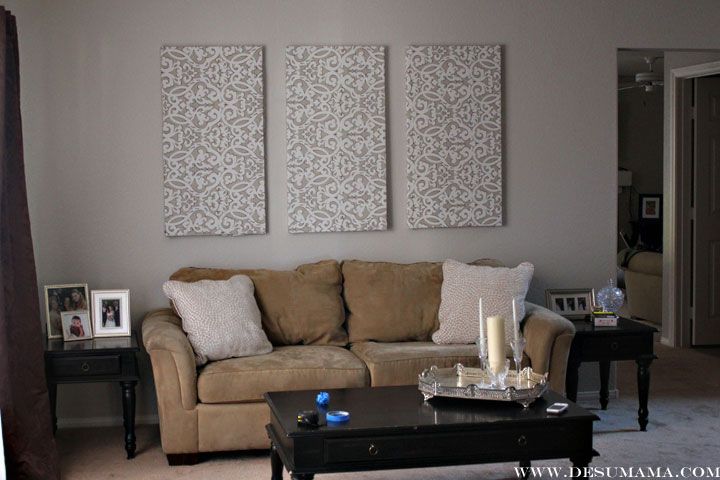
If I can do this, anyone can. Seriously! Making fabric panels for walls is not just easy, but also an inexpensive way to decorate your empty wall space. Fabric wall hangings are modern and beautiful, can be customized to your exact style and are great ways to decorate large/tall walls that would otherwise need huge budgets to fill. I also love how these upholstered wall panels can take any shape and size, allowing you to customize each series to be unique. In fact, after I made this set of 3 DIY fabric wall panels, I decided to use weather resistant fabric to create an outdoor wall panel for our backyard patio! I think it creates the perfect spring backdrop and they’re easy to change out for every season.
So let’s get to it and make some fabric wall panels DIY!
*Update: It’s been two years since I made these modern wall panels and they are holding up great! I even hung our Holiday JOY Ornament Craft on them this year and it was beautiful!
DIY Fabric Panels for Walls
This all started with this fairly large wall in the “formal” living room of our home…basically, the room that guests walk into as they enter our home. Since we don’t typically use this room, we didn’t want to pour a bunch of money into it. This is the room our older furniture wound up (for now). They fill the space nicely and the couch is actually quite comfortable. But I was stumped on what to do about the empty wall space above the couch? I originally envisioned some great piece of art but that wasn’t happening anytime soon. So I took to Plan B and made 3 extra-large fabric wall hangings instead.
What You’ll Need To Make Fabric Wall Hangings
- 1×2 Lumber, sometimes called Stretcher Bars: cut according to your design size. Ask the guys at the hardware store to help cut if needed! For the three canvas frames, I needed 5 bars (which were $0.98 each)
- Nails (2 per side)
- Hammer
- Stapler (yup, your standard household stapler will work just fine!)
- Fabric (weather resistant for outdoor wall decor use)
How to Make Fabric Panels for Walls
1. Design your fabric panel + assemble materials: Measure the space in which you want to hang your fabric panel. Cut the 1x2s to the dimensions required, making sure to allow for the 1/2 inch width of the stick. Most home improvement stores will make the cuts for you. These pieces should not be very expensive. Measure and cut fabric, taking into account 3 things: the orientation of the fabric design (does the design look best vertical, and you plan to hang it horizontally?), add 3-4 inches extra for wrapping and outdoor wall decor needs weather resistant fabric. I made several of these mistakes during my first DIY fabric panel attempt.
2. Make the frame: Using two nails on each side, line up the 1x2s according to your design. My panel was big, so I laid the pieces on the ground for stability. Hammer each nail into the sticks, keeping them as aligned as possible. I do the best I can, but I’m not going for perfect here – you can see where my sticks aren’t perfectly aligned and one nail started to curve. My goals were to make sure the structure was secure and as even as possible. Continue nailing until you’ve created a frame. Use your cute assistant as needed – just make sure they don’t get their fingers near the hammer!
3. Wrap the canvas: Lay down your fabric upside down. Place your newly constructed frame on top. Allow 2-3 inches of fabric around the entire frame. This ensures you won’t have gaps and cover the entire frame. Also, make sure the fabric design is straight and looks the way you want it shown when hung up. Start on a side that is longest, and in the middle of its length, wrap the center towards the corner, continue to staple the fabric to the sticks. Repeat process on the second side. And then again on the widths. Wrap the corners like you would a gift, trimming excess fabric as needed. Pull fabric taut as you go.
Don’t pull too tight, but ensure the fabric is flush to the stick. Then staple making sure the corners are tight and crisp.
A note on the cost of the project: the fabric was the most expensive part! Since my fabric panels were covering a large space, I wanted to love the fabric. Loving anything comes at a cost. And at $40/yard, I love this fabric and its large-scale pattern. I needed two yards (probably three, in hindsight) and had a 40% off coupon. I still spent more on fabric then I budgeted for.
See….learning how to hang fabric on walls is super easy! I even have leftover stretch bars that could be used with less expensive fabric. Maybe a holiday wall covering? Or even solid fabric for our kids’ to paint? One thing is certain, I won’t be purchasing expensive stretch canvas frames from specialty framing stores anymore! DIY canvas frames are so much easier.
Check out our simple DIY Home Tutorials for…
Stuffed Animal Storage for Dog Lovers: DIY Play Kennel
From Cheap to Modern: Updating an Old Planter with Spray Paint

Connie
January 9, 2012 at 7:03 pmYOU ARE WAY TOOOO AWESOME!! I love the panels!!!! So chic!!! Do you have a Pintrest?? It’s my fav!!! 😀 Momma’s little helper!! lol. 😀 Have a great Monday!!!
Las Vegas Mama
January 9, 2012 at 8:36 pmWOW. that is impressive! Looks fantastic!
Emma Kay
January 9, 2012 at 11:24 pmI love all the colours in the room, and the fabric you chose is just great to bring it all together. Nice job 🙂
LC
January 10, 2012 at 5:27 amGreat job!! I am SO doing this!
BTW, I have been trying to reply to your email and it just keeps saying “sending.” IDK what’s gong on!
With my Whole Heart
January 10, 2012 at 6:32 amOh wow!! Love! I did a similar project in Ashley’s room… Need to snap pics. Well done mama.
Stefanie
January 11, 2012 at 4:24 amLooks great!
Erica
January 30, 2012 at 5:22 pmAHHHHHHHHHHHH I’m in love ….this project is beautiful and fills your wall nicely! Great job!
Liz
April 8, 2013 at 8:28 amWhere did you get your fabric from?
Vanessa
April 8, 2013 at 11:44 amHi Liz, thanks for stopping by! I got this fabric from Joann’s, but have seen some really cute ones at Hobby Lobby recently. Good luck!
tara coronado
April 23, 2013 at 11:37 amHi! I LOVEEEE this project I am in a similiar predicament and really wanted something awesome to take up a large space on my wall. I found you through a pinterest search 🙂 I am wondering about the stretcher bars, you said 5 bars for three frames? Im a little confused on this did you already have some wood laying around? I hope mine turn out as pretty as yours, and the fabric is stretched as tightly! Thanks so much for sharing!!!
Vanessa
April 23, 2013 at 12:59 pmHi Tara, thanks for stopping by! You can totally do this… I promise! I probably bought a total of 5 and had the guys at Home Depot cut the bars down to my specific measurements. Hope that helps!
Color Matters | Prosperity Flats
July 31, 2013 at 9:51 am[…] fabric to add color! — This is an easy DIY tutorial on how to make these chic wall panels. For a shortcut step, purchase blank canvas from any art or […]
Dawn
August 12, 2013 at 6:43 pmWhat are the dimensions?
Vanessa
August 13, 2013 at 3:42 pmIt really demands on your wall space. I measured the entire space and decided on dimensions depending on the look I wanted to achieve and the number of panels. Thanks for stopping by.
Inspired Home Decor: JOY Ornament Craft for the Holidays - De Su Mama
December 11, 2013 at 5:40 pm[…] with – being joyous certainly does that. And it happen to fit perfectly in those empty DIY fabric panels. Not into joy? This ornament craft is also great to make monograms or ornament wreaths, […]
Patio Ideas Focused On Legacy Memory Making - De Su Mama
May 15, 2014 at 9:51 am[…] fabric treated for UV protection and Carved Wall Decor in Cool (upper right). Since I’ve made DIY fabric wall panels before, I might even DIY it […]
Our Home: 5 Elements of a Memory Making Backyard - De Su Mama
May 23, 2014 at 10:59 am[…] were so sweet, helping me mix color and patterns to coordinate with the fabric I choose for a DIY Fabric Panel. Now my backyard feels like a happy springtime oasis that is perfect for family […]
DIY Fabric Panel Tutorial For Outdoor Wall Decor - De Su Mama
May 26, 2014 at 2:42 pm[…] wall decor idea is an easy DIY that anyone can make in a short amount of time. I’ve done this DIY Fabric Panel Tutorial before (in our living room), and thought it was a fun way to decorate our patio on a […]
Our Home: Global Inspired Formal Living Room - De Su Mama
July 31, 2014 at 5:41 pm[…] massive wall, where my DIY Fabric Panels once hung, now houses my beloved bookcase. Purchased almost ten years ago, the bookcase is very […]
jenme
February 4, 2017 at 10:52 amHow did you hang these on the wall?
Vanessa Bell
March 10, 2017 at 12:10 pmNails!